Performance testing is a crucial aspect of system optimization and troubleshooting, whether you’re a developer, a system administrator, or an IT professional. On macOS, tools like sysbench, fio, and iperf3 allow you to perform thorough tests of your system’s memory, disk, CPU, and network performance. This guide walks you through the steps to conduct these tests effectively.
Why Focus on Disk, Memory, CPU, and Network Performance?
Understanding and optimising the performance of these four key components — disk, memory, CPU, and network — is critical for ensuring the overall efficiency and reliability of a computer system, particularly in environments where performance directly impacts productivity and service delivery.
Disk Performance:
- Importance: Disk performance directly influences the speed of data access and storage. Slow disk performance can create bottlenecks that degrade the overall system speed, particularly in applications requiring frequent read/write operations, such as databases or file servers.
- Focus: By using tools like
fio, you can assess the IOPS, bandwidth, and latency, helping you to identify potential bottlenecks and optimize the storage subsystem accordingly.
Disk Performance Testing
Step 1: Install fio
fio (Flexible I/O Tester) is a versatile tool for disk performance testing. Though it’s not available directly via the standard Homebrew repository, it can be installed using Homebrew:
brew install fio
Step 2: Run the Disk Test
To perform a disk performance test, execute the following command:
fio --name=fiotest --filename=testfile --rw=randread --bs=4k --ioengine=posixaio --iodepth=64 --size=1G --numjobs=1 --runtime=60 --group_reporting
Explanation:
--filename=testfile: Specifies the file used for testing. It will be created if it doesn’t already exist.--rw=randread: Configures the test to perform random read operations.--bs=4k: Sets the block size to 4KB.--ioengine=posixaio: Utilizes POSIX asynchronous I/O, which is compatible with macOS.--iodepth=64: Sets the queue depth to 64, meaning up to 64 operations can be queued simultaneously.--size=1G: The size of the file used for the test (1GB).--numjobs=1: Executes the test with a single job.--runtime=60: Runs the test for 60 seconds.--group_reporting: Combines the output from multiple jobs for easier analysis.
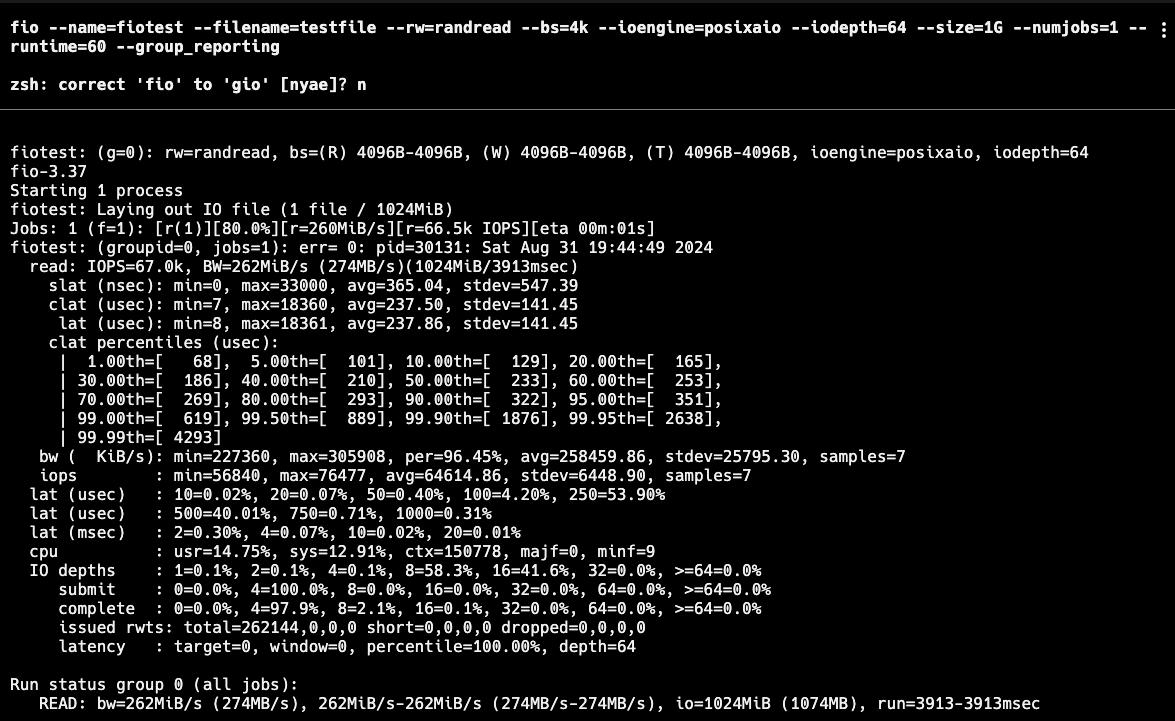
This command will help you measure the Input/Output Operations Per Second (IOPS), read speed, and latency, providing a comprehensive overview of your disk’s performance.
fio Disk Test Results:
- The
fiodisk test results provide detailed insights into the IOPS (Input/Output Operations Per Second), bandwidth, and latency of the storage subsystem. The results show consistent performance with a high degree of reliability, making this disk setup suitable for environments where disk speed and reliability are critical, such as database servers, file storage systems, and high-performance computing tasks.
Memory Performance:
- Importance: Memory speed and latency are critical for the efficient execution of applications, especially those requiring rapid access to large datasets. Insufficient memory or slow memory can lead to increased paging or swapping, severely impacting performance.
- Focus: Through memory testing with
sysbench, you can measure the bandwidth and latency, ensuring that your memory is performing optimally, which is essential for maintaining smooth application performance.
Memory Performance Testing
Step 1: Install sysbench
To begin testing your memory performance, you need to install sysbench. This tool is widely used for benchmarking CPU, memory, and other system resources.
brew install sysbench
Step 2: Run the Memory Test
Once sysbench is installed, you can run a memory performance test using the following command:
sysbench --test=memory --memory-block-size=4K --memory-total-size=10G run
Explanation:
--memory-block-size=4K: This option sets the size of each memory block to 4KB.--memory-total-size=10G: This option tests with a total of 10GB of memory.

This test will output the read/write bandwidth and latency for memory operations, giving you insights into your system’s memory performance.
sysbench Memory Test Results:
- The
sysbenchmemory test results show a total of 10 GB of memory being transferred at an impressive speed of 14,874.73 MiB/sec with negligible latency. This indicates that the memory subsystem is highly efficient, with very low delays, which is essential for memory-intensive applications like databases, virtual machines, or large-scale simulations.
CPU Performance:
- Importance: The CPU is the brain of the computer, responsible for executing instructions and processing data. A powerful CPU ensures that computational tasks are completed quickly, reducing wait times and improving the responsiveness of applications.
- Focus: Stress-testing the CPU with
sysbenchallows you to evaluate its ability to handle complex tasks under load, which is crucial for environments where high computational power is needed, such as software development, scientific computing, or real-time processing.
CPU Performance Testing
Step 1: Install sysbench
If you haven’t already installed sysbench during the memory test setup, you can install it now:
brew install sysbench
Step 2: Run the CPU Test
To stress-test your CPU, use the following command:
sysbench --test=cpu --cpu-max-prime=20000 run
Explanation:
--cpu-max-prime=20000: This option makessysbenchcalculate prime numbers up to 20,000.
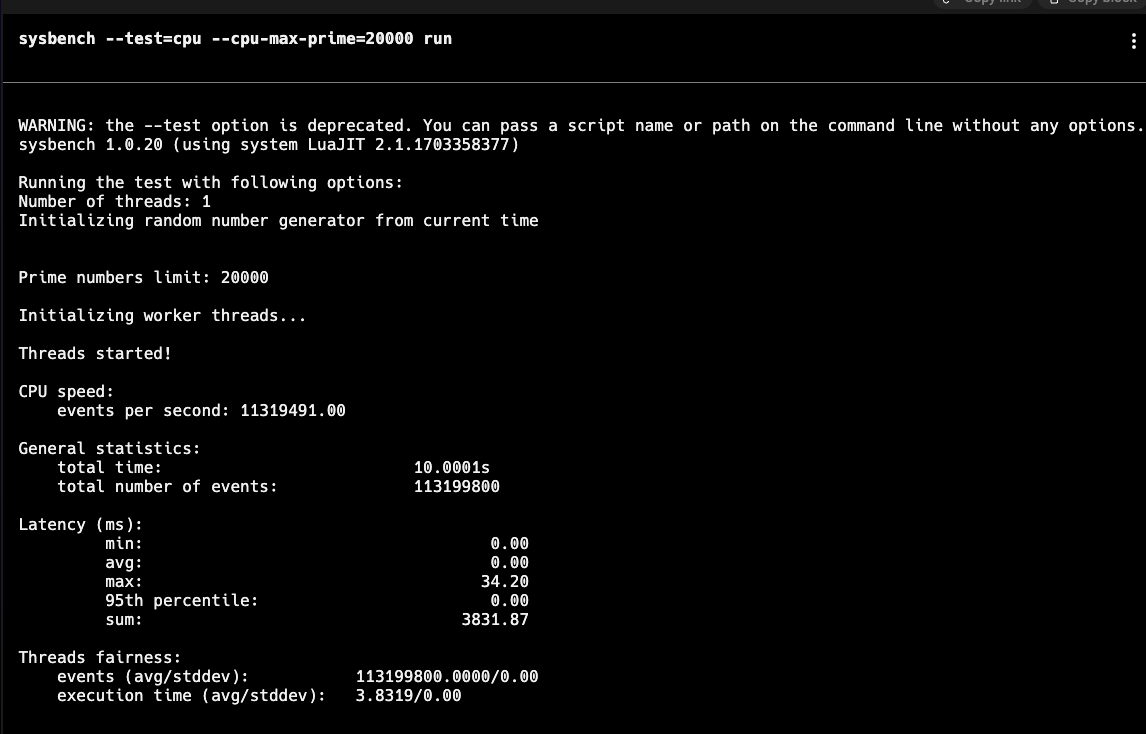
This command measures how effectively your CPU handles computational tasks, giving you an idea of its performance under heavy loads.
sysbench CPU Test Results:
- The CPU test results from
sysbenchdemonstrate the system’s ability to handle computationally intensive tasks by calculating a large number of prime numbers (up to 20,000). The total events processed per second (11,319,980) indicate a robust CPU performance, which is vital for processing-heavy applications like data analysis, machine learning, or video rendering.
Network Performance:
- Importance: Network performance is vital in environments where data is frequently transmitted across systems, such as in cloud computing, distributed systems, or any setup that relies on fast, reliable internet or intranet connections. Poor network performance can lead to slow data transfers, increased latency, and bottlenecks in communication between systems.
- Focus: Utilizing
iperf3for network testing helps you measure bandwidth and latency, ensuring that your network infrastructure can handle the required data throughput without causing delays or interruptions.
Network Performance Testing
Step 1: Install iperf3
To test network performance, install iperf3, a tool specifically designed for network benchmarking:
brew install iperf3
Step 2: Run the Network Test
For network performance testing, you need two machines — one to act as the server and the other as the client.
On the server machine, run:
iperf3 -s

On the client machine, execute:
iperf3 -c [server_ip] -p 5201 -t 60
Explanation:
-s: Starts theiperf3server.-c [server_ip]: Specifies the IP address of the server to test against.-p 5201: Sets the port number to 5201 (default).-t 60: Runs the test for 60 seconds.
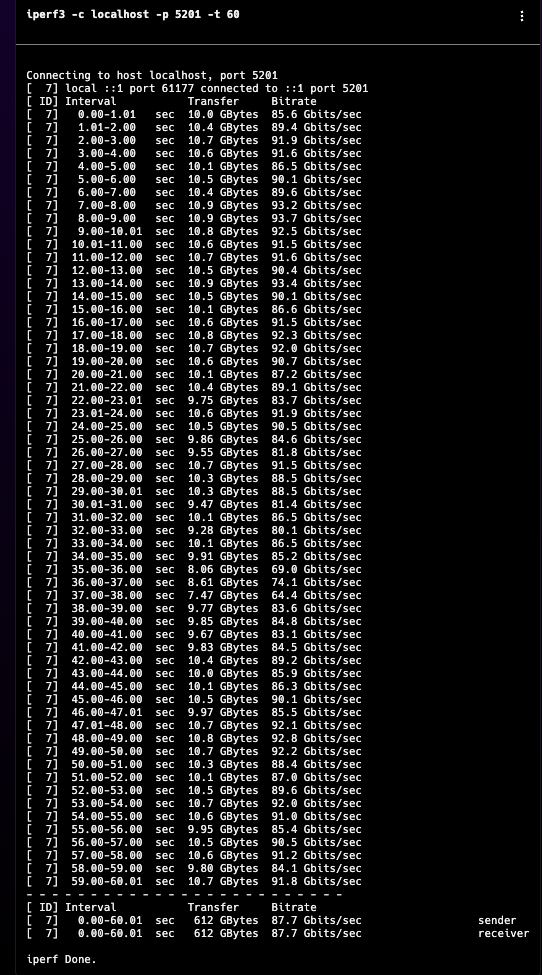
This test measures the bandwidth and latency between the two machines, providing insights into your network’s performance.
iperf3 Network Test Results:
- The
iperf3network test results indicate a consistent transfer rate and bitrate over a 60-second interval, with the final results showing a total transfer of 612 GB at an average bitrate of 87.7 Gbits/sec. This suggests a very high-speed network setup, potentially within a data center or a high-bandwidth local network environment. The steady performance highlights the reliability of the network infrastructure, which is crucial for applications requiring low-latency and high-throughput connections.
In this guide, we’ve explored how to test the four key performance areas of your macOS system — Memory, Disk, CPU, and Network:
- Memory Testing: Use
sysbenchto measure memory read/write speed and latency. - Disk Testing: Use
fioto assess disk IOPS, bandwidth, and latency. - CPU Testing: Utilize
sysbenchto stress-test your CPU by calculating prime numbers. - Network Testing: Deploy
iperf3to measure network bandwidth and latency between two points.
By following these steps, you can gain a comprehensive understanding of your macOS system’s performance. This knowledge allows you to effectively optimize and troubleshoot your system, ensuring that your development environment remains efficient and free from performance bottlenecks.
Conclusion
Focusing on these four components — disk, memory, CPU, and network — is essential for maintaining a high-performance computing environment. Regularly testing and optimizing each aspect with the tools and methods described will ensure your systems operate at peak efficiency. This is especially important in professional settings where performance issues can lead to significant productivity losses or service disruptions.
Incorporating regular performance testing into your maintenance routine not only helps you identify and address potential issues before they become critical but also ensures that your systems continue to meet the demands of your work, enabling you to maintain a robust and reliable computing environment.
References:
- https://github.com/akopytov/sysbench
- https://www.howtoforge.com/how-to-benchmark-your-system-cpu-file-io-mysql-with-sysbench
- https://wiki.mikejung.biz/Sysbench
- https://gist.github.com/hassansin/419e74eae0923d42e0c3
- http://blog.siphos.be/2013/04/comparing-performance-with-sysbench-part-2/
- https://docs.yugabyte.com/preview/benchmark/sysbench-ysql/
- https://github.com/axboe/fio
- https://medium.com/@wrightchen/fio-benchmark-in-depth-exploration-sharing-f7b905c3dfcb
- https://github.com/esnet/iperf
Thank you for sharing superb informations. Your web site is so cool. I am impressed by the details that you¦ve on this website. It reveals how nicely you understand this subject. Bookmarked this web page, will come back for extra articles. You, my friend, ROCK! I found just the information I already searched all over the place and simply could not come across. What a great web-site.
You could certainly see your skills in the work you write. The world hopes for more passionate writers such as you who are not afraid to mention how they believe. Always follow your heart. “Everyone has his day and some days last longer than others.” by Sir Winston Leonard Spenser Churchill.
Thanks for your personal marvelous posting! I genuinely enjoyed reading it,
you happen to be a great author. I will maake sure tto bookmark your bloig and will eventually come back someday.
I want tto enccourage you to definitely continue your great posts, have a nice evening! http://Boyarka-Inform.com
Hiya, I am really glad I have found this info. Today bloggers publish only about gossips and net and this is really irritating. A good website with interesting content, this is what I need. Thank you for keeping this web site, I’ll be visiting it. Do you do newsletters? Can not find it.
Just desire to say your article is as amazing. The clarity in your post is simply cool and i can assume you’re an expert on this subject. Well with your permission let me to grab your RSS feed to keep updated with forthcoming post. Thanks a million and please carry on the gratifying work.
naturally like your web-site but you have to test the spelling on quite
a few of your posts. A number of them are rife with spelling problems and
I to find it very bothersome to inform the reality nevertheless I
will certainly come back again.
It’s a shame you don’t have a donate button! I’d
definitely donate to this outstanding blog! I guess for
now i’ll settlee for bookmarking and adding your RSS feed to my Google account.
I look forward to new updates and will share this site with my Facebook group.
Chat soon!
What¦s Taking place i’m new to this, I stumbled upon this I’ve discovered It positively helpful and it has helped me out loads. I am hoping to contribute & help other customers like its aided me. Good job.
Great content as always. This site is becoming my go-to source.